Search My Blog!

Use the Search box below to find keywords that you're looking for quickly and easily!

Search Feature

Friday, February 16, 2018

I Did It!

OMG I can't believe I actually did it! I finally got 20 lots full of items listed on eBay! Let me just tell you - it's a whole heck of a lot easier (and funner) to buy stuff than it is to sell it. Maybe instead of downsizing my mini collection, I ought to just buy a bigger house!

It was really fun to relive the dreams, challenges and successes going through all the little things I made and added to the barn, Bigfoot shop and dispensary. I remembered how much I loved each thing, and I hope the new owners will get as much joy and excitement from them as I did!

I started the bidding on each auction at $.99, so it will be fun to see if that will generate any excitement. I hope so! Here are the listings (just click on the words and it will open up a new window to the eBay auction page):


Garage and Shop Tool & Equipment Lot


Garage or Shop Work Bench with Tools & Accessories


Craftsman Type Rolling Tool Chest & Shop Stool


Handcrafted Rustic Log Double Bed and Furniture Set


Farmhouse Sink and Cabinet Unit Plus Stools


Loaded Fridge. Oven and Spice Shelf Set


Modified Modern Kitchen Set


Farmhouse Living Room Set Sofa Ottoman Tables and 12v Lamp


End Tables, Craftsman Bookshelf and Television Lot


Shop Fittings Triple Bookshelf and Two Tables


Bathroom Set w Custom Vanity, Shower, Mirror , Toilet. Accessories


Red Kitchen Miniatures


Grocery, Food and Cleaning Items


Diner or Cafe Miniatures


Bongs or Water Pipes and Marijuana Related Accessories (this auction has been removed by eBay, as it violated their drug paraphernalia policy. If you were interested, email me at jodihippler@gmail.com and I'll make you an excellent deal! :O)


Bigfoot or Sasquatch Gift Shop Items


White Store Counter with Mirrored Doors


Camping Scene & Equipment Miniatures Lot


Handmade Miniature Ice & Firewood Bundle Display for Your Store


Handcrafted Miniature Store Counter, Stools and Fridge


Click this link and it will open the page that shows all the auctions I currently have on.

Now my house is in desperate need of a good cleaning before I can get back to any more fun mini projects. Hopefully, though, I'll get some good spray painting weather and finish those sinks up soon!

Stay warm and have a relaxing weekend!

xo xo
Jodi

Tuesday, February 6, 2018

Binge & Purge

I've been on a bit of a bender. A mini bender that is. Since about June of 2012. That's when I allowed myself back into the world of my beloved miniatures. Prior to that, minis were completely out of the picture for nine years. Once I began indulging again, I fell totally off the wagon!

Mini Projects from 2012 - 2013
There were just so many possibilities. So many things to make for the worlds I could create. I just had to have it ALL! I was compelled to try! There was so much to learn! I am sure a lot of you can relate.

Mini Projects from 2014 - 2015
While all this mini love can give you a full heart, it can also lead to a very full house. When some of my finished structures, out of necessity, started matriculating into my bedroom last year, I knew I was going to have to make some tough decisions. Why keep things that were not going to be enjoyed? So, like any difficult decision, I had to let it marinate. But finally, I came to the realization that in order to continue to fulfill my future dreams (and I have plenty), I had to let some of the finished ones go. And really, I am surprisingly at peace with that.

Mini Projects from 2016
But how do you let things go? eBay? Some of the structures would be too cost prohibitive to ship. Plus, who'd want my vision and design choices for their new mini home? Craigslist? There aren't a whole lot of mini enthusiasts in my area, so finding someone who'd be willing to buy a completed project for a fair price seemed pretty implausible.

Projects from 2017

So finally, an idea hit me. What if I separated the minis and furniture from the structures? I could group like items and have fun with $.99 auctions on eBay for the furniture and accessories, then list the structures as "rehabs" on Craigslist. Sounds reasonable, right? The only way to know is to try...


So, I began last weekend with the Real Good Toys Contemporary Ranch. It was a funny project idea to me at the time, but somehow, a marijuana dispensary wasn't funny to me any longer. I began removing all the little wonders, and boy were there a lot of them, trying to cause as little damage to the wallpaper and flooring. Let's just say I learned a lot through trial and error and each room got progressively better. A heat gun and putty knife are essential tools!


I removed practically everything, including all of the landscaping. You'd never know it was once a place where nefarious happenings went on. The wallpaper will have to be replaced or just removed and walls painted. I damaged some spots on the wood flooring in two rooms, but those can be easily filled in and repaired. I am going to leave that up to the new owner. I am even going to leave the hideous green color scheme in hopes that some kind hearted person will want to enjoy the pleasure of it's obliteration. We'll see if there are any takers.


I was surprised how much I enjoyed deconstructing. Maybe just knowing things I'd loved were going to get new life someplace, and that I'd feel free to begin new projects guilt free has something to do with it. Once I had it gutted and the mini items cleaned and sorted, I started on the Real Good Toys Ruff & Rustic barn.


This was one of the projects that I never really finished. Didn't even shingle the roof. Poor planning on my part resulted in unfulfilled visions, and complete loss of passion for the whole project. I learned so much throughout the process, that I still consider the experience a good one. I am just ready to let it go. I am really enjoying and excited about reacquainting myself with every wonderful mini thing I made or specially purchased for the project! Some things I won't be able to let go in this one.


My work table looks like a mini flea market, and with the whole upstairs left to go, I may have a good number of eBay auctions to put together.


The other project that will get dismantled and sold is the Bigfoot tourist shop. I have three more after this, but those structures are smaller and may be better off sold as dioramas. We'll see. Just making progress in organizing and purging feels good to my soul.

xo xo,
Jodi

Friday, February 2, 2018

Sinks For Sam

Sam over at Blueprint Minis has recently discovered some techniques for miniature watercolor painting, and boy has she exposed a hidden talent! If you are not a follower of her blog or seen her awesome works of art, I suggest you go take a look! She shares her resources and encourages everyone to give it a try!


When she left a comment a couple blog posts ago saying she should commission me to make a sink for her basement apartment bathroom in the San Franciscan she's building, I saw my opportunity for a swap! We discussed styles and measurements, then I got to work! I love a challenge, and I super hope that one of the designs I've been playing with will satisfy the look she's trying to achieve.

Sam's Inspiration Sink with My Doodling

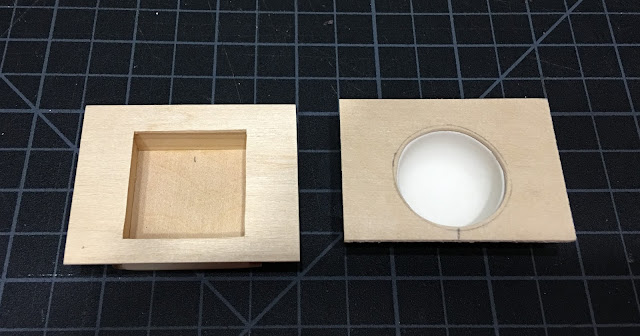
I wanted to try versions with both round and square sinks. I had a square plastic sink left over from a Reallife kitchen kit, and a round one I'd salvaged from the Barn when I realized I wouldn't have space for the two bathrooms I'd planned. These would make suitable models for the prototypes.


The inspiration sink appears to be constructed from thin metal, so I used 1/16" basswood. I cut the top and shelf using the life sized measurements scaled down to 1/12th. It is roughly 3" wide x 2" deep x 3" high (not including the back splash).


To cut the sink hole, I marked the center point between the sides, cheating the sink toward the front edge to leave plenty of space for taps (and bathroom-y stuff). Then I measured each of the sink halves out from the center point, top and bottom, then drew the circle around to connect them. You could also just trace the circle, but my sink will be under-slung and the sink is too large to just trace - the hole would have been too large. You could also just use a Circle Template, but that is one tool I don't have!

To cut the circle, I first traced the line with my flower making stylus, a tip I learned from the fabulous tutorials on Julie Warren's YouTube Channel. Then, my Xacto played nice and just stayed in the pre-grooved line.


To make the rounded legs, I used 1/8" dowel rod, the smallest I had on hand. Scale-wise, I think it's fine. For added stability, I sanded the ends to fit inside bead spacers with holes just slightly less than 3mm. I used contact cement to glue them together, then glued the spacers to the bottom of the sink tops so that the spacers were flush on the sides. To the bottoms, I added another spacer and some tiny beads that looked like they'd make good feet.


I added an extra shelf, as Sam suggested that the more display space the better. And I agree! We both weren't quite sure about the back splash and shelf, and the 3" w x 2" d measurements would leave the bathroom space a little tight.


With adjusted measurements, 2-1/4" w x 1-1/2" d and still 3" h, I cut new pieces, this time using a large bisque bowl for the round sink and a homemade wooden square one.


And employed the same method for the legs with bead spacers and feet. To fit the lower shelves, I traced the 1/8" dowel onto the corners of the shelf pieces, then cut and sanded away until they had a nice fit.


Here are the smaller versions. Sam and I still need to consult about back splash, details and finish, but since she is on a fabulous three week ski vacation, these may sit like they are for a bit. Which is good because, there hasn't been a hint of good spray painting weather here in weeks!


I don't know what that groundhog is seeing, but I never trust that guy, or the weatherman anyway! :O)

Hope the sunshine finds you, wherever you are and whatever the temperature may be!

xo xo,
Jodi